|
|
After all, picture perfect shots are not meant to be stored away and viewed only occasionally. They deserve to be displayed. And displaying large photos exude more impact than—uh—4x6 ones.
If you'd like to try it yourself, then read on and discover:
- the different ways of enlarging digital photos
- the problems you might encounter
- and some tips about pixel sizes before you print your enlargements.
First, it all starts with pixels.
A pixel is a dot of color information. And enlarging digital photos is actually just adding new pixels into the photo. That's why its dimensions (width and height) increase.
This process where the computer adds new pixels into the photo is called interpolation.
In this process, an image editor enlarges a digital photo by analyzing the surrounding pixels. And enlargements vary depending on the algorithm used.
For example, enlarged digital photos are more pixelated when using nearest neighbor interpolation. That's because in this method, the computer simply copies the color of the adjacent pixels. This makes the individual pixels more visible. Unlike in bilinear or bicubic methods where the edges are smoother.
Perhaps you're wondering, what software is needed when enlarging digital photos? Actually any image editor will do. But some image editors offer more kinds of interpolation than others.
So how do you enlarge digital photos? Here's how...
Four ways of enlarging digital photos
Generally, there are 4 ways of enlarging digital photos:
- Manual resizing in your image editor
- Automated actions
- Use of special software
- Have imaging companies enlarge them for you
Let's look at the first option...
Manual resizing in your image editor
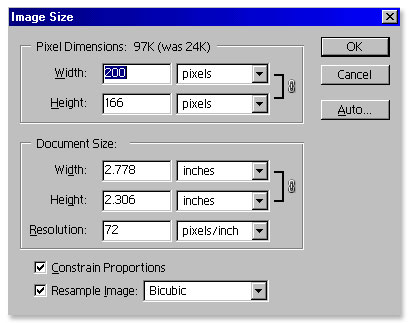
This is the most common way we enlarge digital photos. Let's say we want to double the size of the ff picture. Here's how to do it.
First, launch the Image Size option or the equivalent command in the image editor you use. It's usually under the Image menu. You'll see the current width and height of the photo.
To enlarge the photo, simply enter larger values in the width and height text boxes. You can also enlarge your digital photo by percentage of the original.
In our example, let's double the width. The height automatically recomputes.
To avoid distorting your enlarged digital photo, preserve the ratio to the original by checking the Constrain Proportions option in Photoshop. In Irfanview (another image editor), it's Preserve aspect ratio. This checkbox is usually located at the bottom of the resize window.

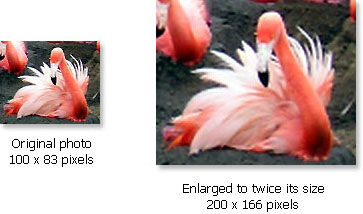
Here's what the original photo and enlarged version look like:

Now, let's discuss another way of enlarging digital photos...
Actions
Not sure with the enlargement size you'd like? Then try the automated actions. Actions are more common in Adobe Photoshop and they are similar to macros in MS Word. Actions automate tasks. And just like in a macro command, you can record a task then keep "playing" it afterwards to repeatedly execute the recorded task.
Here's an example using Adobe Photoshop:
- Open the digital photo you want to enlarge
- Go to the Actions tab (usually beside the History tab) and click the small triangle at the right
- Choose New Action from the pop up menu. Then type a new name for this action (e.g. enlarge photo)
- Click the record button
- Open the image size menu and change pixel to percent for both width and height
- Enter 105 in the width. We'll increase the size of the digital photo by 5%. The height automatically adjusts when the Constrain Proportions option is checked.
- Click Ok then click the stop button at the bottom of the Actions tab.
Now, every time you want to enlarge your photo by 5%, all you have to do is select the action you recorded (listed in the Actions tab) and click the Play selection button. Your digital photo will be enlarged by 5% each time you click the Play button. You can click repeatedly until your digital photo reach the size you want.
This saves you time instead of repeatedly opening the Image size menu and manually changing the pixel dimensions each time.
While traditional image editors are helpful in enlarging digital photos, too much enlargement leads to blurry and pixelated photos. This is especially noticeable when your original photo is low resolution to begin with.
Using our above example, when I enlarged the original photo to 300 x 249 pixels (about 300% of the original), the resulting enlargement becomes blurry and pixelated. Like this...
![]()
You see enlarging digital photos has its limits. When you exceed the recommended sizes, your digital photos become blurry and pixelated. See the little squares especially near the edges?
The more you enlarge your digital photos, the more you'll see the individual pixels.
That's why if you're scanning photos, scan at a higher resolution. If viewing on screen, scan with at least 150 dpi if you plan on enlarging your digital photos later.
What if you want to enlarge photos beyond what standard image editors are capable of? You might be interested in the next option.
Use specialized software for enlarging digital photos
This type of software is specifically designed to handle digital photo enlargements. Some examples include Genuine Fractals and Photozoom Professional among others.
While these software can enlarge your digital photos in larger sizes than your image editor are capable of, they are expensive, though. They are only worth it if you're enlarging digital photos frequently.
Next, don't have time to tinker with photo editing software?
Have imaging companies enlarge your digital photos for you
If you seldom enlarge digital photos and want to opt for convenience, then the best choice for you is to look for imaging companies that offer Digital Photo Enlarging services. Let the professionals enlarge your digital photos for you.
There are many such companies online and offline. Why not do some background search of reputable companies? See if their prices are reasonable enough and will allow you to save less instead of printing on your own. Check out their customer testimonials.
If you're satisfied and want to try their service, then send your photos to them online. Indicate the size you want. And they'll ship the enlarged digital photos right at your doorstep.
If you do decide to do-it-yourself...
Half of the fun in enlarging digital photos is printing them and sharing them with others.
Are you ready to print your enlarged digital photos, but you're confused about resolutions and sizes? Then here's a simple formula to remember: divide the width by the number of dpi. Do the same for the height.
For example, you're using a 6-megapixel camera. The 6-megapixel camera has a pixel dimension of 3,072 on the long side (width) and 2,048 on the short side (height). Assuming you are using a 240 dpi inkjet printer, simply divide 3,072 pixels by 240 dpi and 2,048 pixels by 240 dpi. The answer (12.8 x 8.53) becomes the maximum print size that such a digicam can produce.
What if you want to print at 300 dpi? If that's the case, then divide 3,072 by 300 and divide 2,048 by 300. Your digital photos will be approximately 6x10 inches.
A 3-megapixel camera is limited to producing up to 5R print only. Let's say the pixel dimension of a digital photo taken from a 3-megapixel camera is 2,048 x 1,536 pixels. If you plan to print it with a 300-dpi resolution, then the maximum enlargement you can print is 6.8 x 5.12 inches.
Note: Pixels and dots are often used interchangeably. So when you read ppi (pixels-per-inch), it's the same as dpi (dots-per-inch).
Assuming you will be printing at 300 dpi, here are some more examples of pixel sizes for printing digital photos:
| Print size | Pixel dimensions | Approx. size in megapixels |
| 4" x 6" | 1200 x 1800 | 2 megapixels |
| 5" x 7" | 1500 x 2100 | 3 megapixels |
| 8" x 10" | 2400 x 3000 | 7 megapixels |
| 11" x 14" | 3300 x 4200 | 14 megapixels |
| 16" x 20" | 4800 x 6000 | 29 megapixels |
Ok, let's recap.
Whew! As you practice enlarging digital photos yourself, you'll notice that pixelization is the number one problem you'll face.
That's why it's always best to take pictures using your digital camera's highest resolution. This includes as much details in your digital photos right from the start. That way, when you enlarge your digital photos, there's less chance of pixelization.
When enlarging digital photos, ask yourself: are you going to do it yourself or ask the professionals?
If you'd like to do it yourself, you can either use your image editor or buy a specialized software for digital enlargements.
But if you want to save time and effort, then order your digital enlargements from imaging companies.
And after enlarging your digital photos, don't forget to display the fruits of your labor. :-)
Return from Enlarging Digital Photos to the Home Page