|
|
Photo calendars are inexpensive but thoughtful gifts that can be enjoyed all year-round.
Why not create one containing photos of your family, pets, and vacations? You can also include photos of the kids and send a copy of the calendar to their grandparents. And while you're at it, why not design a theme? Like a birthday party, your favorite foods, and places.
Just imagine being reminded everyday of these special memories.
Have you tried to make a calendar from your digital photos yet?
If not, then now is the time to create a photo calendar. Actually, you can create one anytime of the year, and start at any month you like.
Great! Now what will you need?
You'll need special software to create a photo calendar. One that will let you add your favorite photos while giving you the flexibility to customize the overall design according to your taste.
Many calendar software allow you to:
- Add pictures for each month
- Insert captions
- Include special events like birthdays and anniversaries
- And edit the colors, fonts, and borders to suit your taste
For our example, we'll use My Photo Calendar software from Digi-Labs to make a calendar from digital photos.
You can use another calendar software. The menus might be different, but usually the basic functions are similar. Ok, here goes:
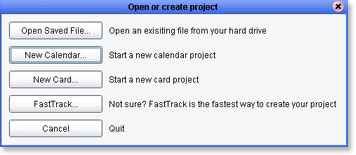
- Launch your calendar software, and click the New Calendar button.
- Choose a size and a template. If you're printing from home, select the size of the paper you'll use.
- Select the starting month and the year. And if you want the holidays to appear in your calendar, check your country from the list. Then click Ok to proceed.
- Now you're on the main screen. On the left side, you'll see the thumbnails of the cover page and the calendar months. Now it's time to customize each month.
- You can now add photo on the cover page by dragging a photo from the Images tab. Then double click "Your Text Here..." to add your own caption.
- After that, click the Pages tab to view the thumbnails, and then click the first month to highlight it.
Similar to the front cover, you can add a photo by dragging a photo from the Images tab or double-clicking the image placeholder to load an image.
- Personalize your calendar by adding special events and occasions!
To add a birthday, double click the specific date on the calendar. A window pops up where you can fill up the details.
You can also add a clipart or your own photo to liven up the reminder:
- Send your finished calendar to Digi-Labs for printing; or
- Print at home
- Choose the maximum quality printing your computer is capable of
- Use a photo quality paper for professional looking printouts.
- When in doubt about the paper position and margins, try to print on plain paper using the economy mode. When you're satisfied with the layout, this is the time you put the photo quality paper and print in maximum quality.
- After printing, you might want to have your calendar spiral-bound in your local copy shop.

Click Ok.


Tip: Put all the photos you'll use in one folder. This will make adding photos to your calendar easier and faster.
You can do this by clicking the Images tab (on the left panel) and selecting the folder containing all the pictures you'll use.


After you click Ok, the reminder appears in your calendar:

Don't forget to save your work!
Now, you're ready to print
There are two ways you can print your calendar:
If you'd like Digi-Labs to print your calendar, simply click the "Send to Digi-Labs" button from the toolbar. Or choose this menu option under the File -> Print menu.
Then follow along the user-friendly guide to send your calendar to Digi-Labs.
But if you'd rather print at home, here are some tips you might find useful:
Now your favorite photos are no longer just sitting inside your hard disk.
What a worthy project to make a calendar from digital photos. And the fun doubles when you share and show off your work!
Return from Make a Calendar from Digital Photos to the Home Page