Uploading digital photos
to online albums
The word 'uploading' might sound technical, but uploading digital photos is actually easy.
Have you ever received one of those emails that invite you to view a friend's digital photos online? Ever wondered how she did it?
Well, your friend did that by first creating an online album then by uploading her digital photos.
Uploading digital photos simply means sending a copy of your digital photos from your computer to online digital photo albums. Your original photos are still safely stored in your computer. Only a copy is sent online.
Ok then, why upload your photos online?
You upload your photos so you can view them in a slide show, order prints and photo gifts, or simply share them with family and friends.
Uploading digital photos is very simple. Don't be distracted by all those links and menus.
Here's how it works...
In our example, I'll use Yahoo Photos because it's very easy to use and it's free. Note: if you already have a Yahoo ID, just sign into
http://photos.yahoo.com
using your existing ID.
If you don't have a Yahoo ID, don't worry. Most online albums have the same basic features. Even the steps in creating new albums and uploading digital photos are nearly the same. Just apply the ff steps to an online album of your choice.
Ready? Let's get started:

1. First, sign into Yahoo Photos (or your
online photo service provider of choice).
If this is your first time to upload photos, click the Get Started button. Then the Continue to Yahoo! Photos.
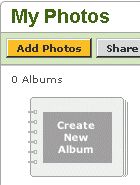
You'll be taken to the My Photos main screen. See the icon with the words Create new album?
Click it to create a new album.
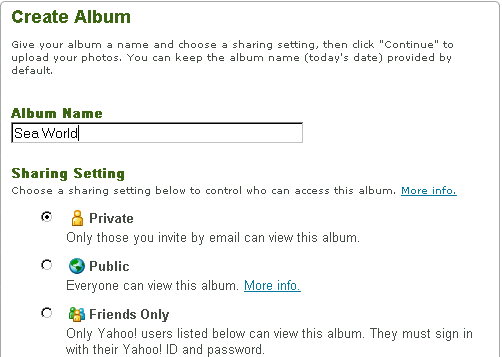
2. Enter the name of your new album and choose the Sharing Setting.

You probably got introduced to this online album by receiving a friendly invitation through email. If you'd like to send invitations similar to the one you received, then choose the Private option.
Click Continue.
Note: Some online albums allow you to set the sharing options after you uploaded your photos. Either way, you can always change the sharing settings at any time after you created your album.
If you're using Internet Explorer and this is the first time you're uploading digital photos, a dialog box will pop up asking you if you'd like to install the Quick Upload tool. This is a one time download and will speed up your uploading time dramatically, because you can select multiple photos to upload at once.
Unfortunately, this feature only works for Internet Explorer. If you're using a different browser, you'll be advised to use the one-by-one upload.
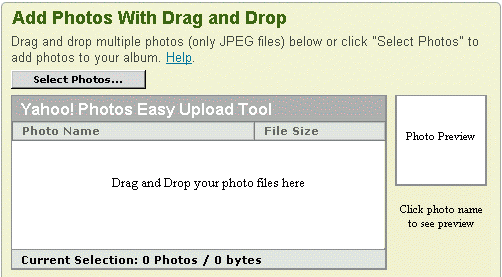
3. If you decided to install the Quick Upload option, just navigate to your digital photos using Windows Explorer. Select the photos you want to upload, then drag these photos into the Quick Upload window.

Click the Continue button. A status bar appears to show the upload progress. When uploading is completed, an Upload Complete message is shown onscreen.
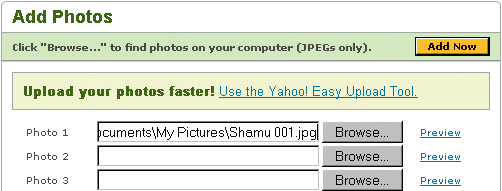
4. If you decide to use the one-by-one upload instead, just click the Browse button then select the digital photo you want to upload. Do this for every digital photo you want to upload.
Here's what the screen looks like:

A status bar also appears to show the upload progress.
5. After uploading, click View Album to view your uploaded photos.
That's it! You now have your very own digital photo album. Just repeat the above steps every time you want to create new albums and upload new photos.
Don't forget to utilize the features available
To fully utilize the features available for your digital photos, read the tips or FAQ provided by your online photo service provider.
1. Check what file types are allowed.
For example, in Yahoo Photos and Shutterfly, only JPEG photos are allowed. But in another online service like Snapfish, you can upload bitmaps (BMP files) aside from JPEGs.
2. Check the different ways of uploading digital photos.
Don't be stuck with one-by-one uploading. Use Quick Upload or Select Photos whenever possible to speed up the upload process.
3. Discover some tips to make it easier and faster to upload your pictures.
Let's say your browser doesn't support Quick Upload. Do you need to switch to another browser? Not exactly.
In Snapfish, for instance, you can upload a zip file containing your digital photos (in jpeg format).
So, add all the digital photos you want uploaded in one album into a zip file. Then go to the Upload Photos section and upload it. Snapfish extracts your digital photos from the zip file into your album. It's like using Quick Upload within the one-by-one upload section.
There are tips specific to the online photo service provider you use.
Try them out and happy uploading! :-)
Online Digital Photo Albums
> Uploading Digital Photos